Published Jul 31, 2024
Create a bidirectional data sync with Google Sheets
How to dynamically read and write data across your business tech stack.

With Celigo’s Google Sheets connector, your spreadsheets can dynamically read and write data across your business tech stack.
In a previous article, we demo how to automate lead syncing in Google Sheets.
Here, we demonstrate how Google Sheets can intelligently communicate with your CRM, streamlining record entries and updates. While we use a CRM as an example, the connector can integrate with various systems, including ERPs, HR applications, and more.
Let’s dive into a practical example.
Google Sheets video walkthrough
Imagine you’re a Business Development Representative at a customer conference. You and your team want to use a shared Google Sheet to easily view and update information on current customers and future prospects attending the conference.
Your mission is to meet each customer, capture new information, and have that data sync back to your CRM (Salesforce) automatically. This way, you avoid re-entering information or having your system administrator import updates after the conference.
To do this, you have enlisted the help of your Celigo administrator, who will connect a Google spreadsheet to your Salesforce instance and then build two flows.
- The first flow will export Salesforce’s existing customer conference attendee details into the spreadsheet.
- The second flow will use spreadsheet entries to add new attendees or update details for existing ones in Salesforce.
Celigo provides pre-built templates for Google Sheets from the Celigo Marketplace. These templates are partially pre-configured to make it easier to get started.
Let’s see how these templates are used in practice, beginning with the first flow, which will export information on conference attendees in Salesforce and import that information as rows in a Google Sheets Spreadsheet.
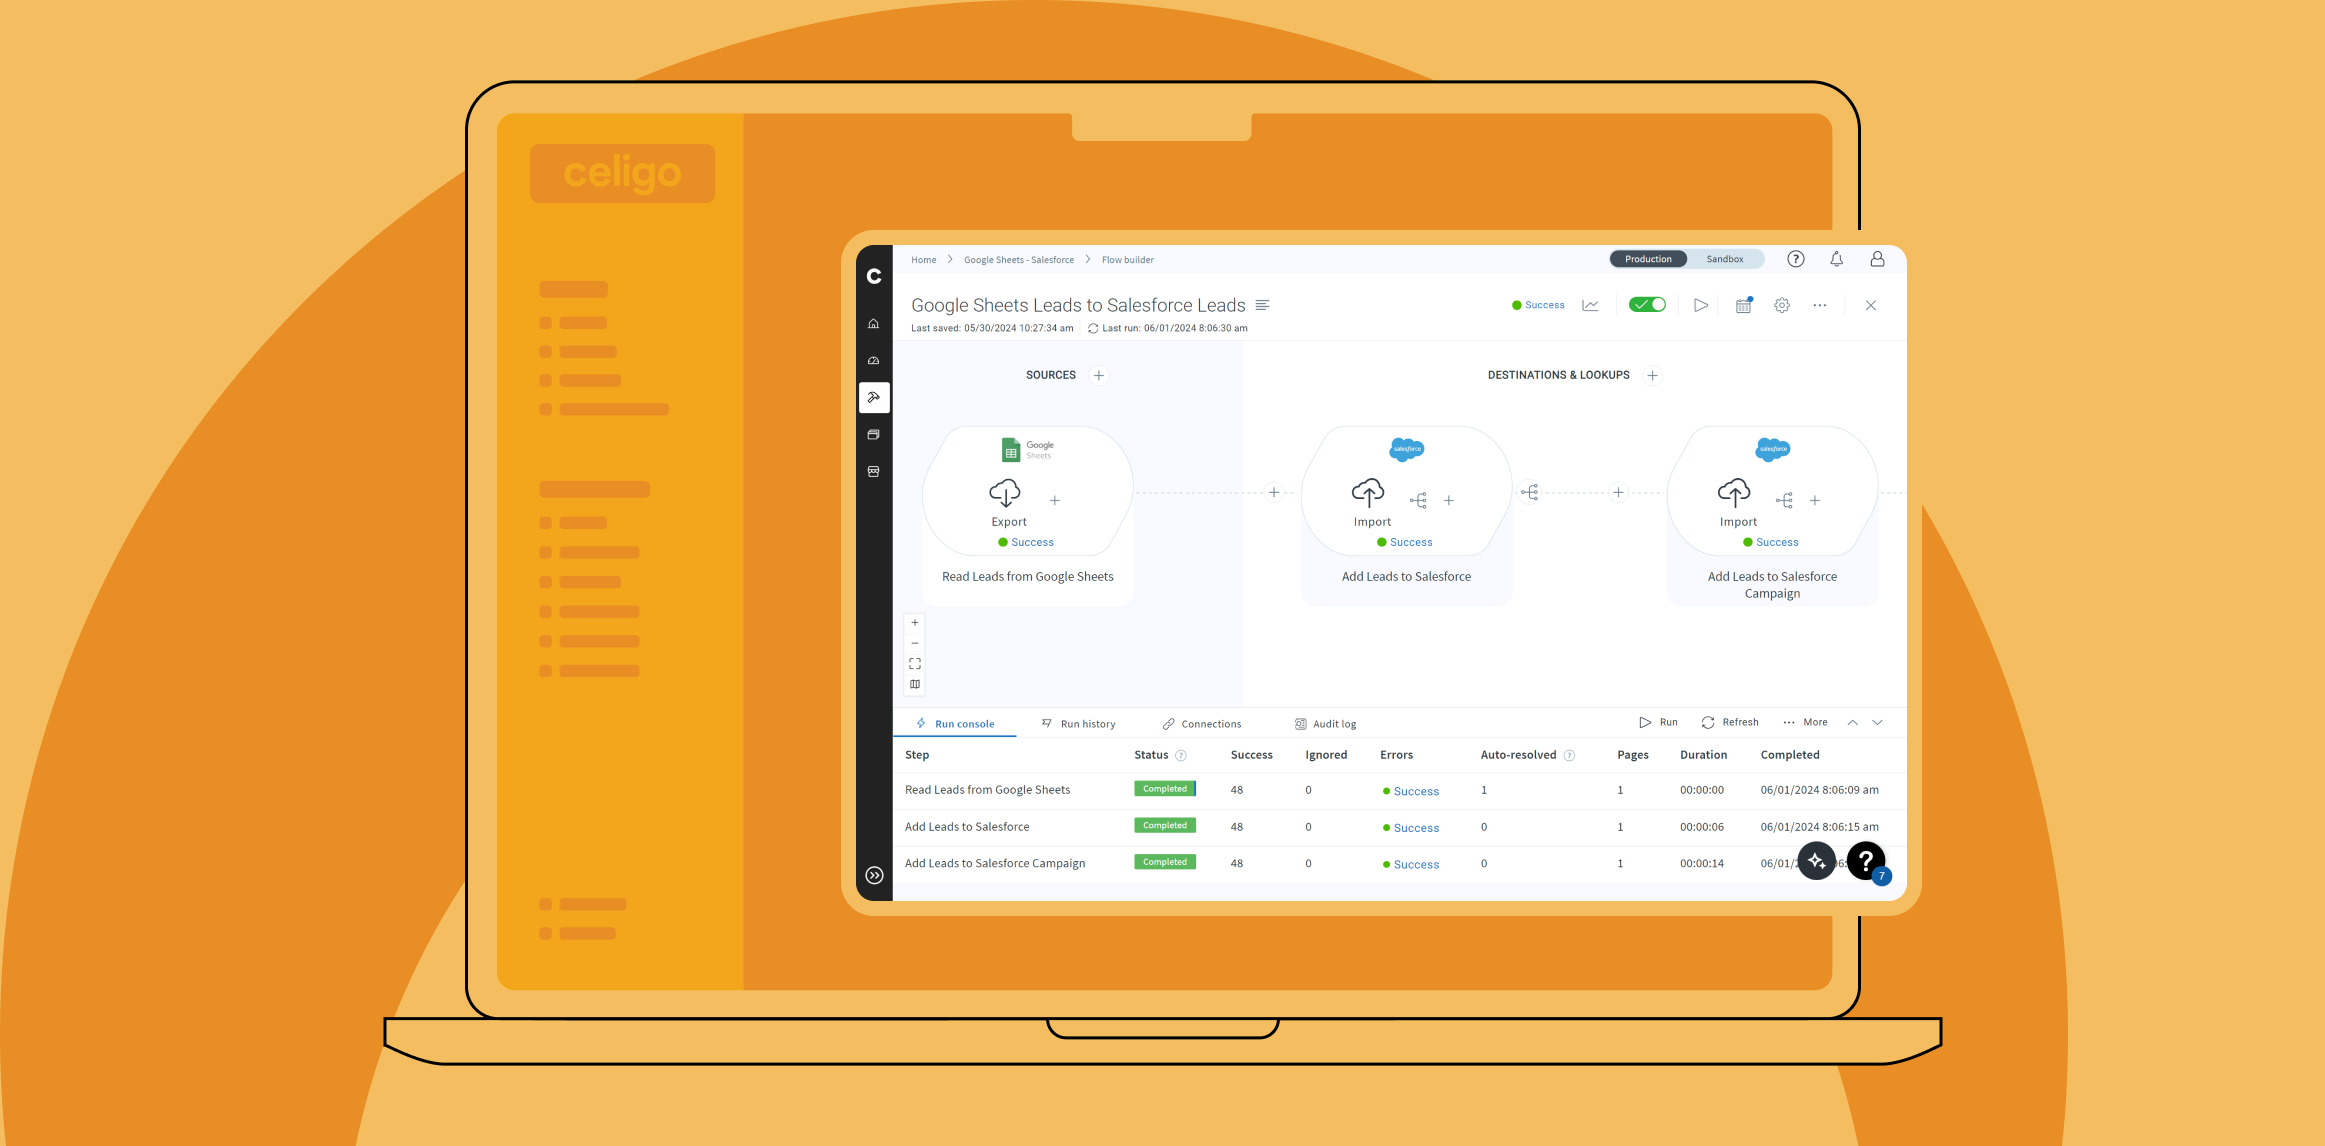
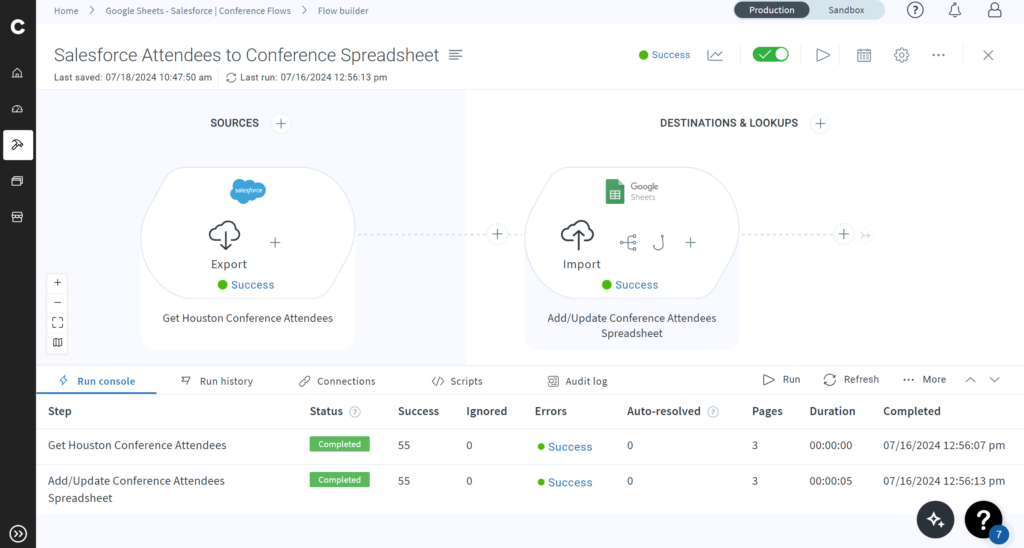
Flow 1: Conference attendees to Google Sheets
Below is the configuration of the complete flow. This is a two-step flow. In the first step of this flow, conference attendees are exported from Salesforce. In the second step, we import the information on these attendees to a Google Sheets spreadsheet.
To better understand the Google Sheets connector, we’ll take a step back. Let’s assume the Salesforce export step is already configured, and now we need to build the Sheets step from scratch.
We’ll begin from an empty step and click “Add destination/lookup” to configure this step with the Sheets connector.
![]()
You’ll be prompted to select the application you’d like to use. To narrow your options, begin typing “Google Sheets” in the application field.
Next, configure the “What would you like to do?” field. Remember that records are coming out of Salesforce (our source application), and we want to put those records into Google Sheets (our destination application).
We’ll select “Import Records into Destination Application.”

Before you click “Create Flow Step” to create a Google Sheets destination/lookup, scroll down to find preconfigured flow steps from the Celigo Marketplace’s collection of templates. The steps recommended vary depending on the application you’ve chosen, what you would like to do with this step, and the type of step you’re building (export, import, lookup).
Template flows are built to save you time and have best practices baked in. We’ll select the “Update Existing Rows and Append New Rows” step. This particularly useful template flow makes adds and updates to your spreadsheet possible by including a pre-written hook.
Click ‘Next’ to move on, using this template flow step as a starting point.

The Google Sheets import form (pictured below) is the next thing you’ll see. If you use a template, some of this information will be filled out in advance.
We’ll look at the ‘General’ tab first.

- Name your import: Here, we name our import so that it describes our flow in detail.
- Description: To distinguish this flow step, more descriptive details can be added here.
- Connection: A Connection is a reusable object you can create to connect your various application environments to integrator.io. We’ll need to create a Google Sheets connection to access/affect our Google Sheets environment.
One to many: Suppose the records traveling through the flow are parent records to the child records you mean to target. One record in the flow will be referenced to create many records. The help bubble for this field will explain this use more deeply. However, this isn’t needed for this flow.
After giving this step an appropriate name, creating a connection is perhaps the most important step we can take first.
We’ll look at how to create a Google Sheets Connection next.
Creating a Google Sheets connection
In the “Connection” field, we can either select or create a connection. Let’s assume this is our first time creating a Sheets connection. We’ll click the blue “create connection” text in the field to reach the following “Create Connection” screen.

Give your Connection a name. We’ll be able to select and reuse the same Connection for the next flow.
Next, click ‘Scopes’. You can think of scopes as the permissions for your Connection; and what it can and can’t do in your environment. For example, we’ll have to write values into the spreadsheet in this flow. We’ll keep that in mind when selecting scopes.

Notice we have two scopes, one is marked “readonly”.
The other scope will enable both read and write access. Since we need to write values into our Google Sheets environment, we’ll select that scope. Press the ‘>’ button to move the scope to the right side, then save this configuration.
Now, after clicking “Save & Authorize,” we’ll be prompted to select the Google account we wish to use and allow integrator.io the permissions it needs to connect to our environment.
Once you’ve chosen your account and acknowledged these permissions, your connection is complete.
Configuring the Google Sheets import
With a connection added, the general configuration is complete. However, under the ‘Settings’ tab, we have a few fields to check before we move on to mapping.
Below is the complete configuration of this step, as it fits into this flow:

Let’s briefly look at these fields one by one:
- Spreadsheet ID: You’ll need to supply the ID of the spreadsheet you’d like to use in your flow. Copy this segment out of the URL and paste it into this field. The help bubble for this field will inform you where to find this segment.
- Sheet name: By default, the first spreadsheet in a Sheets project will be named ‘Sheet1’. However, if you have multiple sheets or named sheets, make sure to enter the name of the specific spreadsheet you’d like to access in single quotes. Ex. ‘ConferenceSpreadsheet’, ‘Sheet2’, etc.
- “Does your sheet have column headers?” Checkbox: This checkbox is very important. If your spreadsheet begins with a row of column headers (like all good spreadsheets do!) click this box. The spreadsheet used in this case features headers to make information easily readable and well-organized.
- Headers: This box will be filled automatically after all options are configured.
- Column to find existing rows: To avoid double entries and find existing columns to update changed values, we need a column to match. Make sure this column in the spreadsheet is a single column that is always unique, something like an ID or (in this example) an email address. Simply type the column’s name in this field as it appears in your spreadsheet.
- Source record field to find existing rows: This refers to the field in records exported by earlier steps (like the Salesforce source export that began this flow in our case) that will be used to find matches. This field will match values in the spreadsheet column specified above to determine existing rows as the flow runs.We want to match the email of Salesforce records to the email of attendees in the spreadsheet. Where a match is found, an update will be considered. If no match is found, an attendee will be added.
Now, with all the configuration complete, we can map the information from Salesforce to our Google Sheets spreadsheet.
Import mapping with Google Sheets
Let’s grasp this entire flow broadly. In our scenario, we assume that Leads and Contacts have already been added as Campaign Members to a Salesforce campaign created to track the event. In the initial export from Salesforce, we include Campaign Member attendee details like name, role, company, email, and useful notes on the attendee. The attendee info is then sent to the Google Sheets step to be imported into the spreadsheet.
Below is the complete mapping for the Sheets import step of the flow, along with the empty spreadsheet with the column headers selected.
![]()
Note that where we map to Google Sheets, we use the column name. Intuitively, the field chosen from Salesforce (corresponding to the fields on the right side) will be added under the chosen column in Google Sheets (corresponding to the fields on the left side) on a record-per-row basis.
This flow is ready with this step fully configured and mapped. After running the flow, the spreadsheet is filled with information for all known conference attendees.
We’ll now focus on the second step.
With the second step, information manually entered into the spreadsheet during the conference will be imported into Salesforce as new records or updates to existing records.
Flow 2: Spreadsheet adds/updates to Salesforce
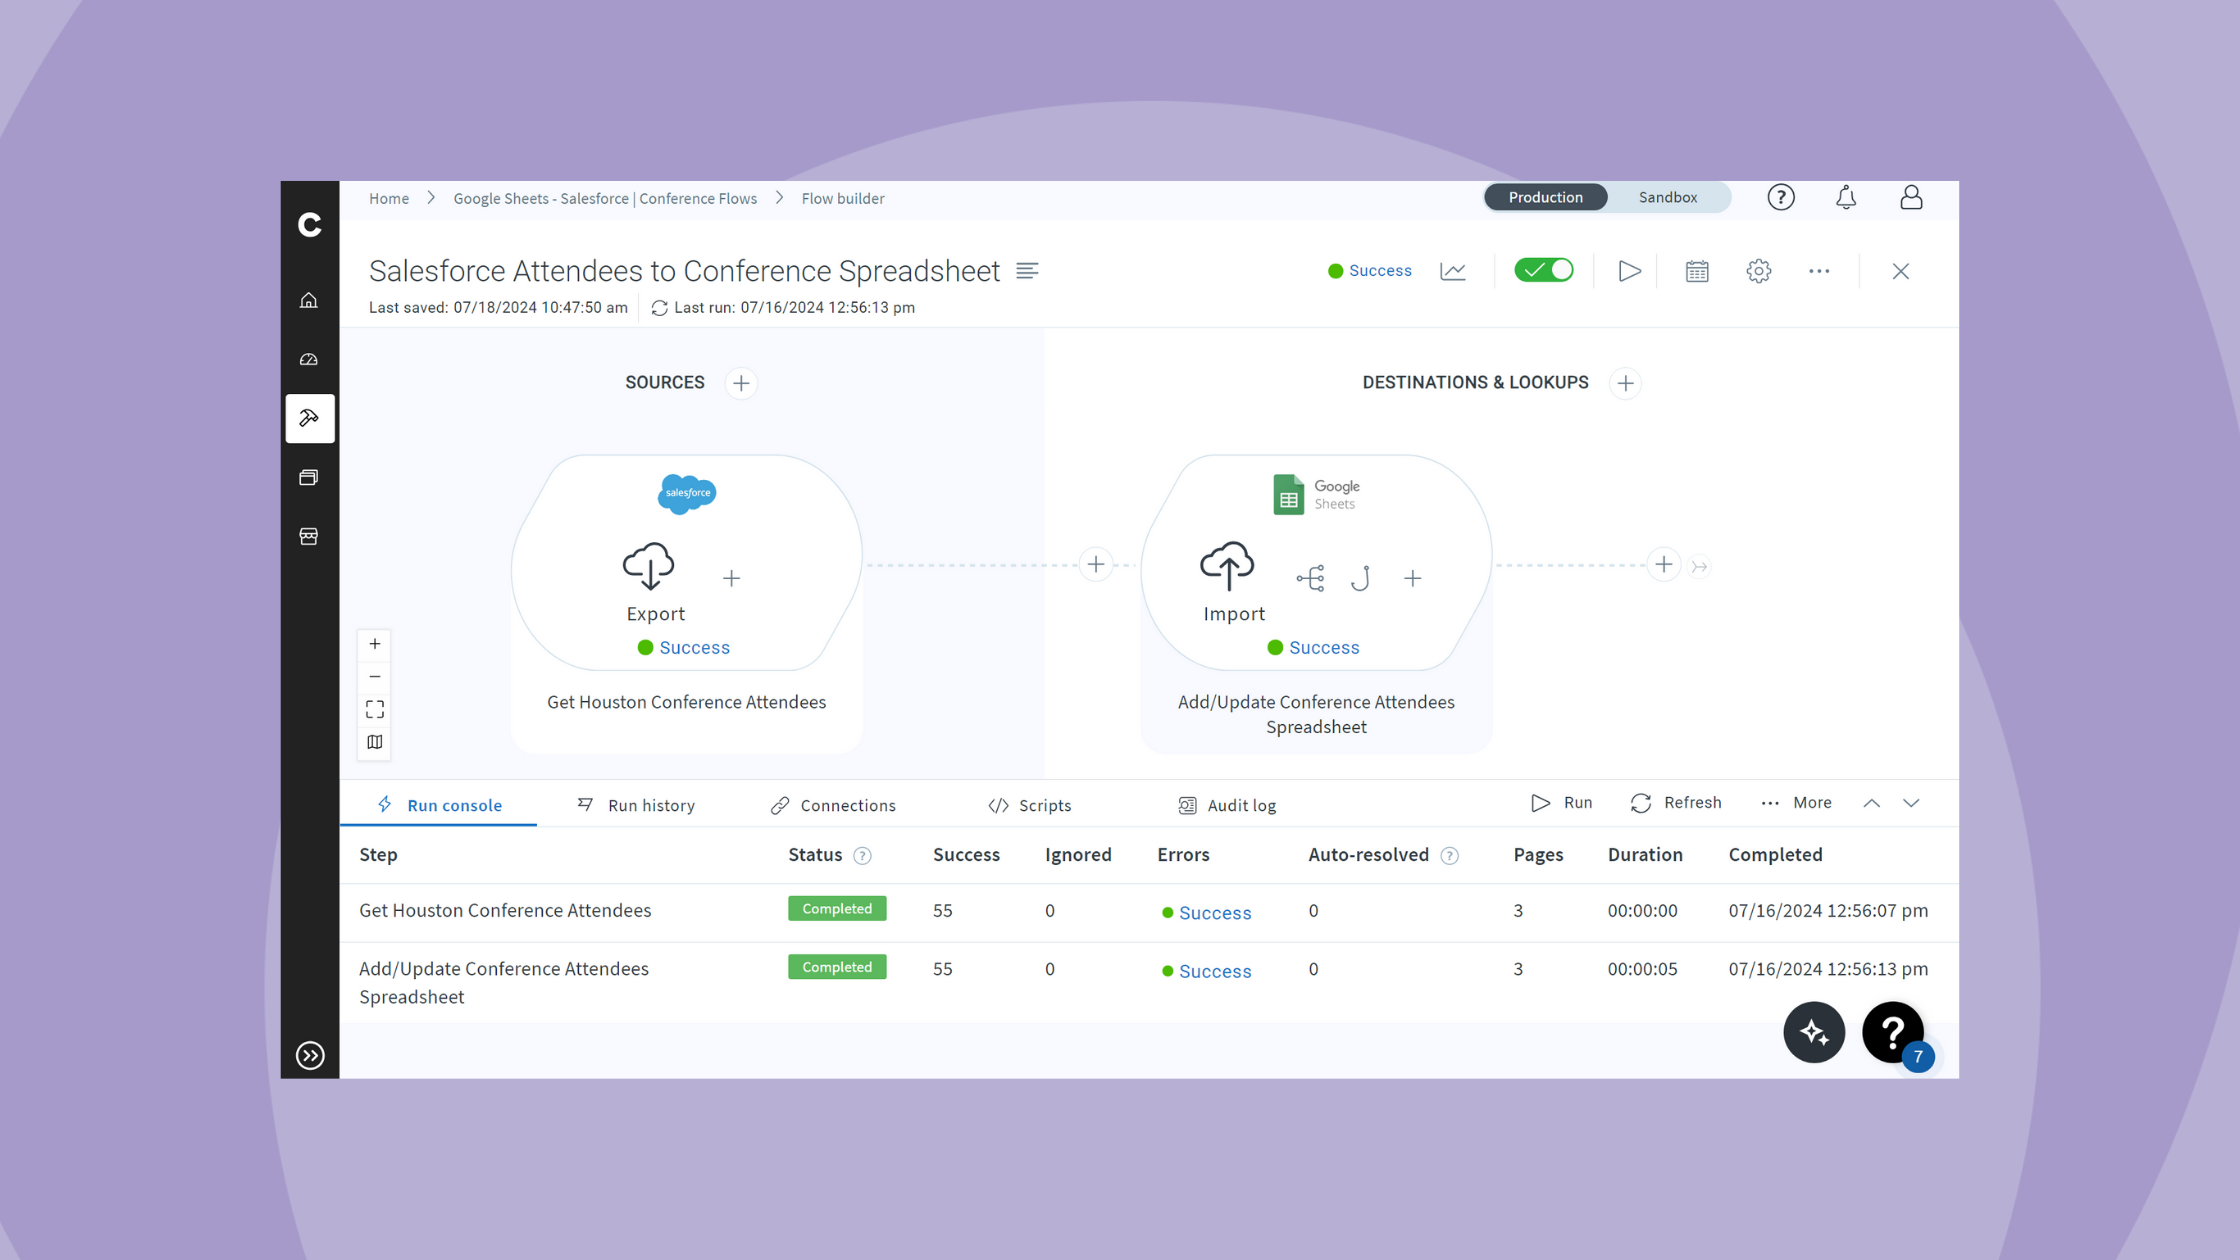
Let’s look at the structure and purpose of this flow (pictured below).

The first export step of this flow will read all the information from the spreadsheet, bringing all the known attendees into the mix. Next, a branch will sort records based on whether they are designated a “Prospect” or a “Customer”.
The “Prospect/Customer” column from the spreadsheet notes whether the attendee is a “Prospect” (a potential customer) or a “Customer” (someone from a business we are known to work with). The branch will respectively send them to a step to add/update either a Lead or a Contact based on their label.
In the final step, the new Leads and Contacts are added to the Conference Campaign (but only if they were not previously added).
Now that we understand how this flow achieves our goal, let’s look closely at the first Google Sheets Export step.
Configuring the Google Sheets Export
A copy of the “Read All Data from Spreadsheet” export from the marketplace was used to start this step. Below is the complete configuration of this step. The same Connection was used, further simplifying the setup.
You’ve already seen fields like the Spreadsheet ID and the “headers” checkbox (which simply needs to be checked or unchecked depending on your spreadsheet format), but there are a few extra features in a Sheets export you’ll need to configure that are not in a Sheets import.
- Resource: Here, you’ll select the general use case that fits your purpose.
- Spreadsheets: This resource deals with entire sheets and their metadata.
- Spreadsheets.developermetadata: This resource relates specifically to metadata, as developers have applied it.
- Spreadsheets.values: This resource allows you to access the values inside the spreadsheet cells. In other words, you can retrieve the information from your spreadsheet. This is the most common resource and was used for this step.
- API endpoint: This is where you decide what you would like to do with the selected resource. The options open to you will change depending on the resource. For example, after selecting “Spreadsheets.values” for our resource, we’ll choose “Get” to retrieve all the values in the spreadsheet. More specific resources can also be used, like “Batchget”, which allows you to get data from multiple specific ranges inside the spreadsheet, and “Batchgetbydatafilter”, which allows you to target multiple ranges that match filters.
- Range: To get specific about what data you’d like to access, you can use A1 Notation. If you’d simply like to get all the data from a sheet (as we will in this flow), enter the name of the sheet you’re targeting (found in the bottom left of your spreadsheet) in single quotes (ex. ‘Sheet1’, ‘MySpreadsheet’, etc).
The step is complete after being configured to access values in the spreadsheet with the “Spreadsheets” Resource and pull those values into the flow with the “Get” resource.
Below is an example of how we’d enter information into the spreadsheet to use this flow. This flow step will read every row from the spreadsheet, match the email field for updates, and create new records in Salesforce for rows that lack IDs to match.
So, “Peter Smith” from Mohr Inc. will be added to Salesforce, and other rows will be checked for updated data that differs from their respective Salesforce record.

We can click the calendar icon in the top right to schedule this flow to run daily, synchronizing the information entered each day of the conference into our CRM.
Furthermore, to sync the IDs back from Salesforce every time this flow runs, we can select the ‘settings’ icon (right beside the calendar icon) and set our first flow to run immediately after this one. That way, the empty ID columns in this row will be filled in by the first flow immediately after this second flow runs.
Enhancing your workflow with Google Sheets integrations
Whether your use case involves writing to spreadsheets, reading information from them, or both, integrating with Google Sheets is simple and significantly enhances their capabilities. Using flow steps from the Celigo Marketplace makes the process even quicker and easier. Instead of viewing spreadsheets as just a data repository, you can use them as an intermediary to quickly enter data into other applications.
Additionally, you can automate the compilation of data from various applications into your spreadsheets, streamlining your workflows.
Let’s get started
With Google Sheets integrations, you can enhance data management and boost real-time analytics, enabling more accurate and efficient workflows across your organization.
Already a user? Install the template
Integration insights
Expand your knowledge on all things integration and automation. Explore our resources, learn from experts, and elevate your building expertise.