Published Jul 8, 2024
Lookup steps: A complete guide
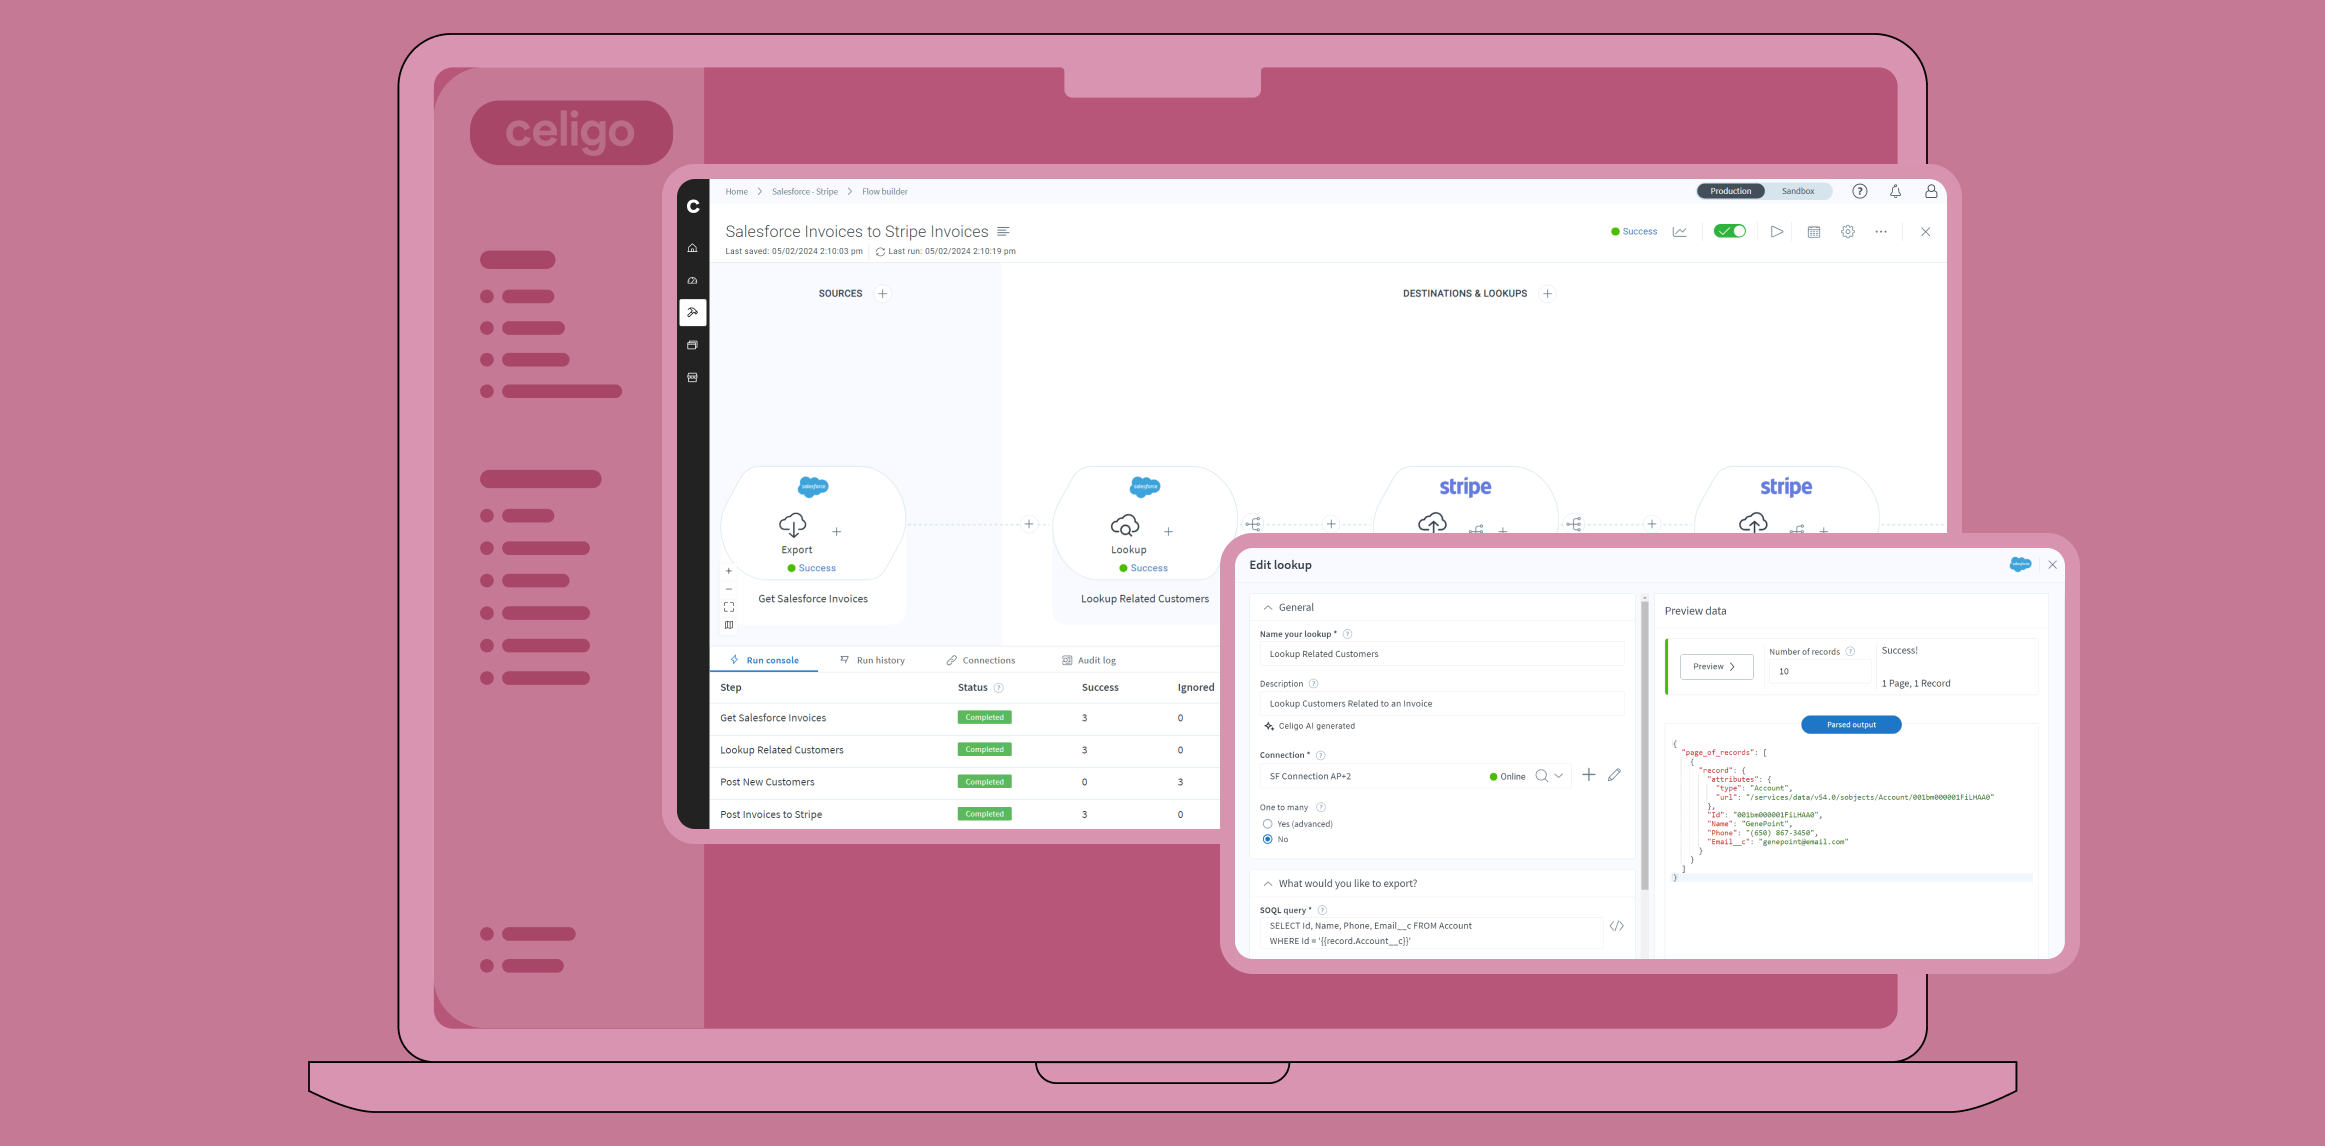
Lookup steps ensure your workflows are robust, efficient, and capable of handling complex data synchronization tasks. This guide walks through creating lookup flow steps, understanding their optimal use, and leveraging results and response mapping.
What you’ll learn
- How to create a lookup flow step
- When and where to use a lookup
- Using results mapping and response mapping
Lookup overview
When setting up workflows, it’s common to need data from related records. For instance, if you’re syncing invoices from Salesforce CRM to Stripe, your payment platform, it’s pretty straightforward. However, Stripe needs you to link a customer to the invoice when creating it. If the customer isn’t already in Stripe when you’re adding new invoices, the flow will fail.
This scenario involves “looking up” the account associated with the invoice in Salesforce. It gathers details from each invoice record to identify the related account. Once this information is obtained and forwarded, we can add the customer in Stripe. Following that, we’ll generate the invoice for the newly added customer.
In this article, we’ll fix a flow with this exact issue to explore how and when to implement lookups in your flows.
Setup (optional)
It isn’t necessary to follow along with building the flow used in this article. This article will demonstrate how to add a lookup and where it is useful in an actual flow. This knowledge can then be applied to your own flows featuring other applications. However, if you’d like to follow along, you will need a few things before starting.
First, you’ll need a paid Salesforce account with the Salesforce Billing add-on or custom Salesforce objects corresponding to the native Salesforce Invoice object. If you create a custom Invoice object, a free developer account on Salesforce is enough. You will also need a Stripe account, which is free to create and sufficient for this flow.
The need for a lookup

Pictured above is the flow before adding a lookup. It is a simple two-step flow. The first step retrieves invoices from Salesforce and sends them along. In the second step, Stripe takes that data and creates corresponding invoices.
We’ll begin by looking at this flow to understand why a lookup is needed.
Salesforce export (get invoices)

This export step uses an SOQL query to gather necessary invoice details from Salesforce. In the preview, we can see invoices that are available for retrieval. However, the issue arises when sending these invoices to the customer/account linked to them. Our query fetches the Salesforce Account ID but lacks other crucial data to create a corresponding customer in Stripe.
If a Salesforce customer isn’t in Stripe, the flow will fail. While advanced SOQL can fetch this data, using a lookup is a simpler solution. Not all applications let you pull records in one go as advanced SOQL does in Salesforce. That’s why lookups are crucial for workflows that depend on related records.
After retrieving information about our invoices from Salesforce, we send it to the next flow step, which will import these invoices into Stripe.
Stripe import (post invoices)

This is the final step of our flow. Here, we will take the invoice information from Salesforce and create corresponding invoices in Stripe. We need to map the details of our Salesforce invoices over to Stripe by configuring this step’s import mapping.
This is where the issue with our approach becomes even more apparent.

A help bubble in the mapping menu informs us there are required fields for Stripe invoices. These fields need a value for the step to run. In the screenshot of the mapping menu, we can see fields for Stripe (our “destination”) invoices. The “Customer” field is grayed out with a lock icon beside it to indicate that it is required.
Without an assigned value, we cannot complete this mapping.
The problem with this flow
We need the account/customer attached to the Salesforce invoice to create a corresponding invoice in Stripe. However, according to our earlier SOQL query, the only account-related data we can use is the related account’s ID. Furthermore, Stripe needs a customer record to already exist in its environment and attach it to the invoice.
To fix this flow, we’ll first ensure that the corresponding customer is created in Stripe before creating the corresponding invoice. That way, we have a customer in Stripe to attach to the required “Customer” field for invoices, whether the customer involved was new to Stripe. To accomplish this, we’ll use a lookup.
Fixing the flow with a lookup
A lookup step is like an export with a key difference. Rather than affecting information inside an endpoint, a lookup retrieves more information from it and adds it to the flow. This typically will occur based on other information already traveling through the flow. In this case, on a record-by-record basis, a Salesforce lookup will use the data about the invoices retrieved earlier to find the related accounts. After adding this information to the flow, we’ll use a Stripe import to create customers.
Then, with the customers added in Stripe, we can map the customer over and all the invoice details, allowing this flow to create invoices with new and preexisting customers.
Adding a lookup

To add a lookup between these steps, we will click the plus button and then “Add destination/lookup.”

After selecting the application of our choice (in this case, Salesforce), we go into the dropdown where we describe what we’d like to do and select “Look up additional records (per record).”
Alternatively, you can look up files per record, but since we need to bring in related records we’ll make sure we are looking up “additional records.”
Configuring the lookup
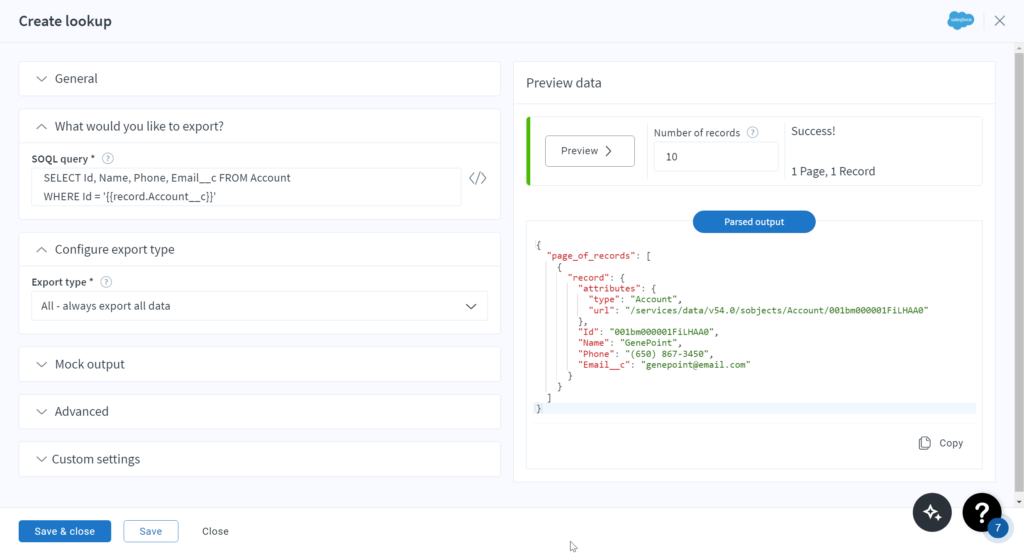
This step appears identical to the earlier Salesforce export, except for a small difference in the “What would you like to export” section. Using handlebars, we can inject data from earlier flow steps into the logic we use to retrieve records.
Using handlebars in this context works since the Salesforce connector uses SOQL to retrieve records. In other cases, a lookup might use a dropdown to access fields exported in earlier steps or other mechanisms special to that application’s API (like a saved search in the case of NetSuite). Regardless, the idea is the same. We look up other records using the fields of previously exported records and add them to the flow.
To demonstrate this further with this example, we’ll click the “</>” symbol to the right of our query and experiment with the builder.
Editor with handlebars
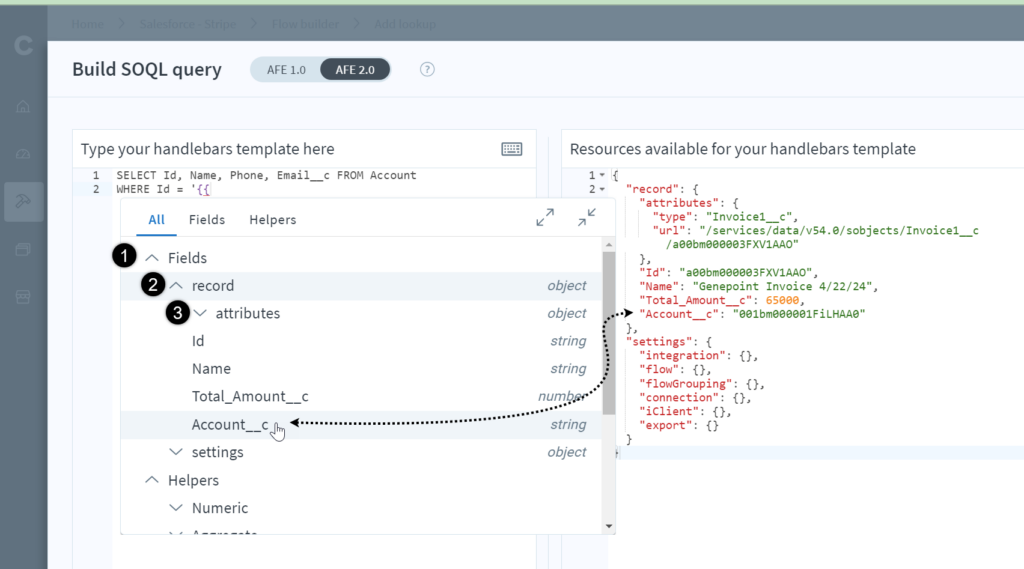
After clicking the “</>” symbol, we can build our SOQL query. Notice that as we begin entering in handlebars, Celigo suggests two larger categories: “Fields” and “Helpers.” We don’t need to compute anything with a helper function; we just need to extract a field. So, we click into the Fields dropdown and are presented with a record dropdown. In the attributes dropdown of our record, we can find all the fields we retrieved for Salesforce invoices.
Our query is looking for a condition to execute: it will retrieve information on Salesforce accounts “WHERE” the ID of the accounts is equal to something. We want the info of accounts related to the invoice to match an existing Salesforce account using the related account ID (Account__c) (Note that this is a custom field as this implementation used a custom copy of invoices).
By clicking the field we want to inject, Celigo will resolve the syntax of the handlebar expression for us. Remember, this lookup will occur on a record-by-record basis. So, this step will examine each invoice. In doing so, each invoice will have its related account found and its relevant information added to the flow.
Note that there can occasionally be an issue where your handlebars will not be used to access preview data unless the flow runs. To work around this, you can hardcode the result. This way, data will propagate through your flow to fill the preview window with test data, making mapping easier.
Below is an example of hardcoding in a single ID for testing purposes.
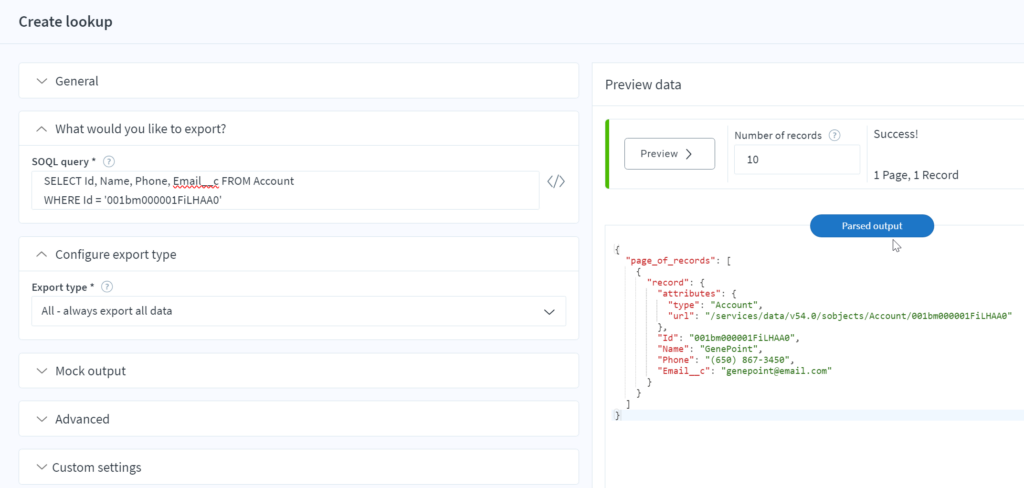
I’ve placed the ID in single quotations for this to work. By using this in the preview, I will see useful test data to build my mapping from in the following steps. Just be sure to change this back to a dynamic handlebar expression before running your flow, and make sure your handlebar expression is nested in single quotes.
Adding lookup data with results mapping
To integrate the data retrieved for related accounts into our flow, we’ll need to capture this information using Results Mapping.
Click ‘Define Options’ for this lookup step, then click the mapping icon to the right of this step to configure its Results Mapping.

You can see the actual data of the looked-up record is placed inside an array of results called ‘Data.’ If you are unfamiliar, an array is a collection of things denoted with square brackets ‘[]’ which contain the objects inside. I know this array is only of length 1 since there will only be 1 related account for any given invoice. So, I will take the first and only element in this array (the 0th element, counting starts at 0 for arrays) using square brackets with the numbered element I want from the array. I’ll call this result a “related account.”
If you look at the preview output, you can see this will add a field called “related_account” to each invoice record traveling through the flow. This information will be used to create a new customer in Stripe.
Using retrieved lookup data
Next, a Stripe import is added after the lookup. This step will create a customer using the account data retrieved by the lookup. This step will ensure the customer is added to Stripe if they weren’t there previously and pass the ID of the new customer to the final step (or pass the ID of the preexisting Stripe customer if they have previously been created).
Below is the configuration of this step.

To determine if a record already exists in Stripe, this step uses the condition that the email of an existing customer in Stripe matches the email of an account coming from the Salesforce lookup. We don’t want to duplicate customers, so some logic to protect against duplicates is good to include.
Next, we’ll configure the import mapping for new Stripe customers.
Import mapping with lookup data

We map to our destination application using the fields from the related account retrieved by the lookup. Notice that a dropdown menu makes this much easier. Find and select the field you need, and Celigo will resolve the right syntax for that field.
Response mapping
By clicking the ‘plus’ button (‘Define Options’) inside of this Stripe step, we’ll map what is returned from this import step by configuring its Response Mapping. This differs from Results Mapping, which occurs after a lookup step and integrates the lookup data into the flow.
Response Mapping is useful for capturing the ID of newly created records or matched records found as a result of configuring the “Ignore Duplicate Records” option.

Notice that in the input preview, we have several fields that we can retrieve. The most important and only field we need is the “ID.” As mentioned above, this ID is the customer’s ID in Stripe that was either created or found to already exist in Stripe. Regardless, we can be sure that this ID corresponds to the customer attached to the Salesforce invoice and the customer we should use for the corresponding Stripe invoice.
With the correct customer retrieved, we can finish mapping our final flow step and get this flow up and running.
Completing the flow
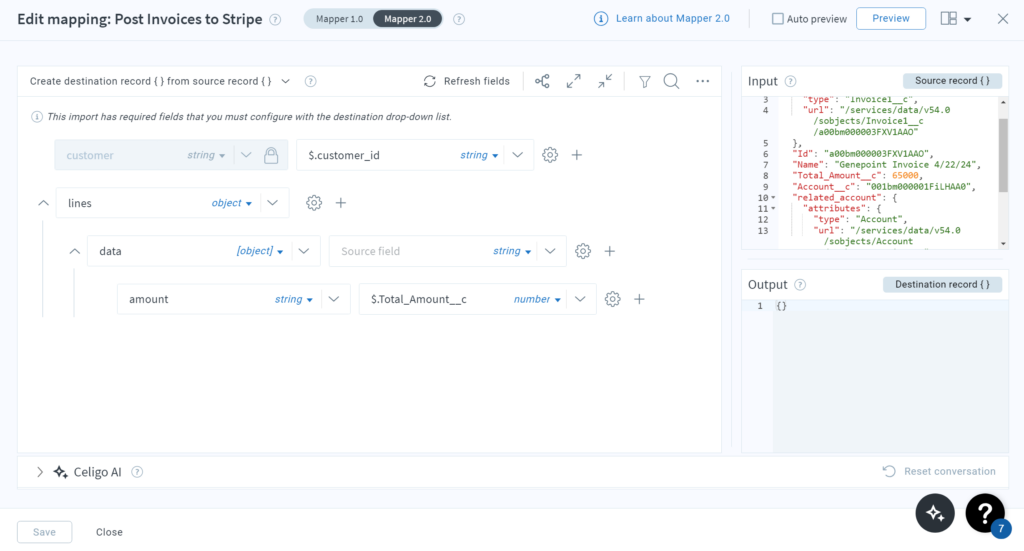
This example maps only the fewest details for an invoice possible. Others can be added, but this is done to demonstrate the utility of our customer ID retrieved earlier from Response Mapping.
We assign this ID to the required “Customer” field, so Stripe knows what customer to use.
Now, let’s try running the flow.

The flow works as expected! Every step processed the records flowing through correctly. We can even see that the three customers retrieved in our lookup were added in the “Post New Customers” step.
Lookups recap
Lookup steps are essential for handling dependencies on related records in your integration flows. By incorporating lookups, you can retrieve and integrate necessary data on a per-record basis, enhancing the versatility and reliability of your automation.

