Published Oct 17, 2024
Securely connecting Celigo to a private resource (in a private subnet)

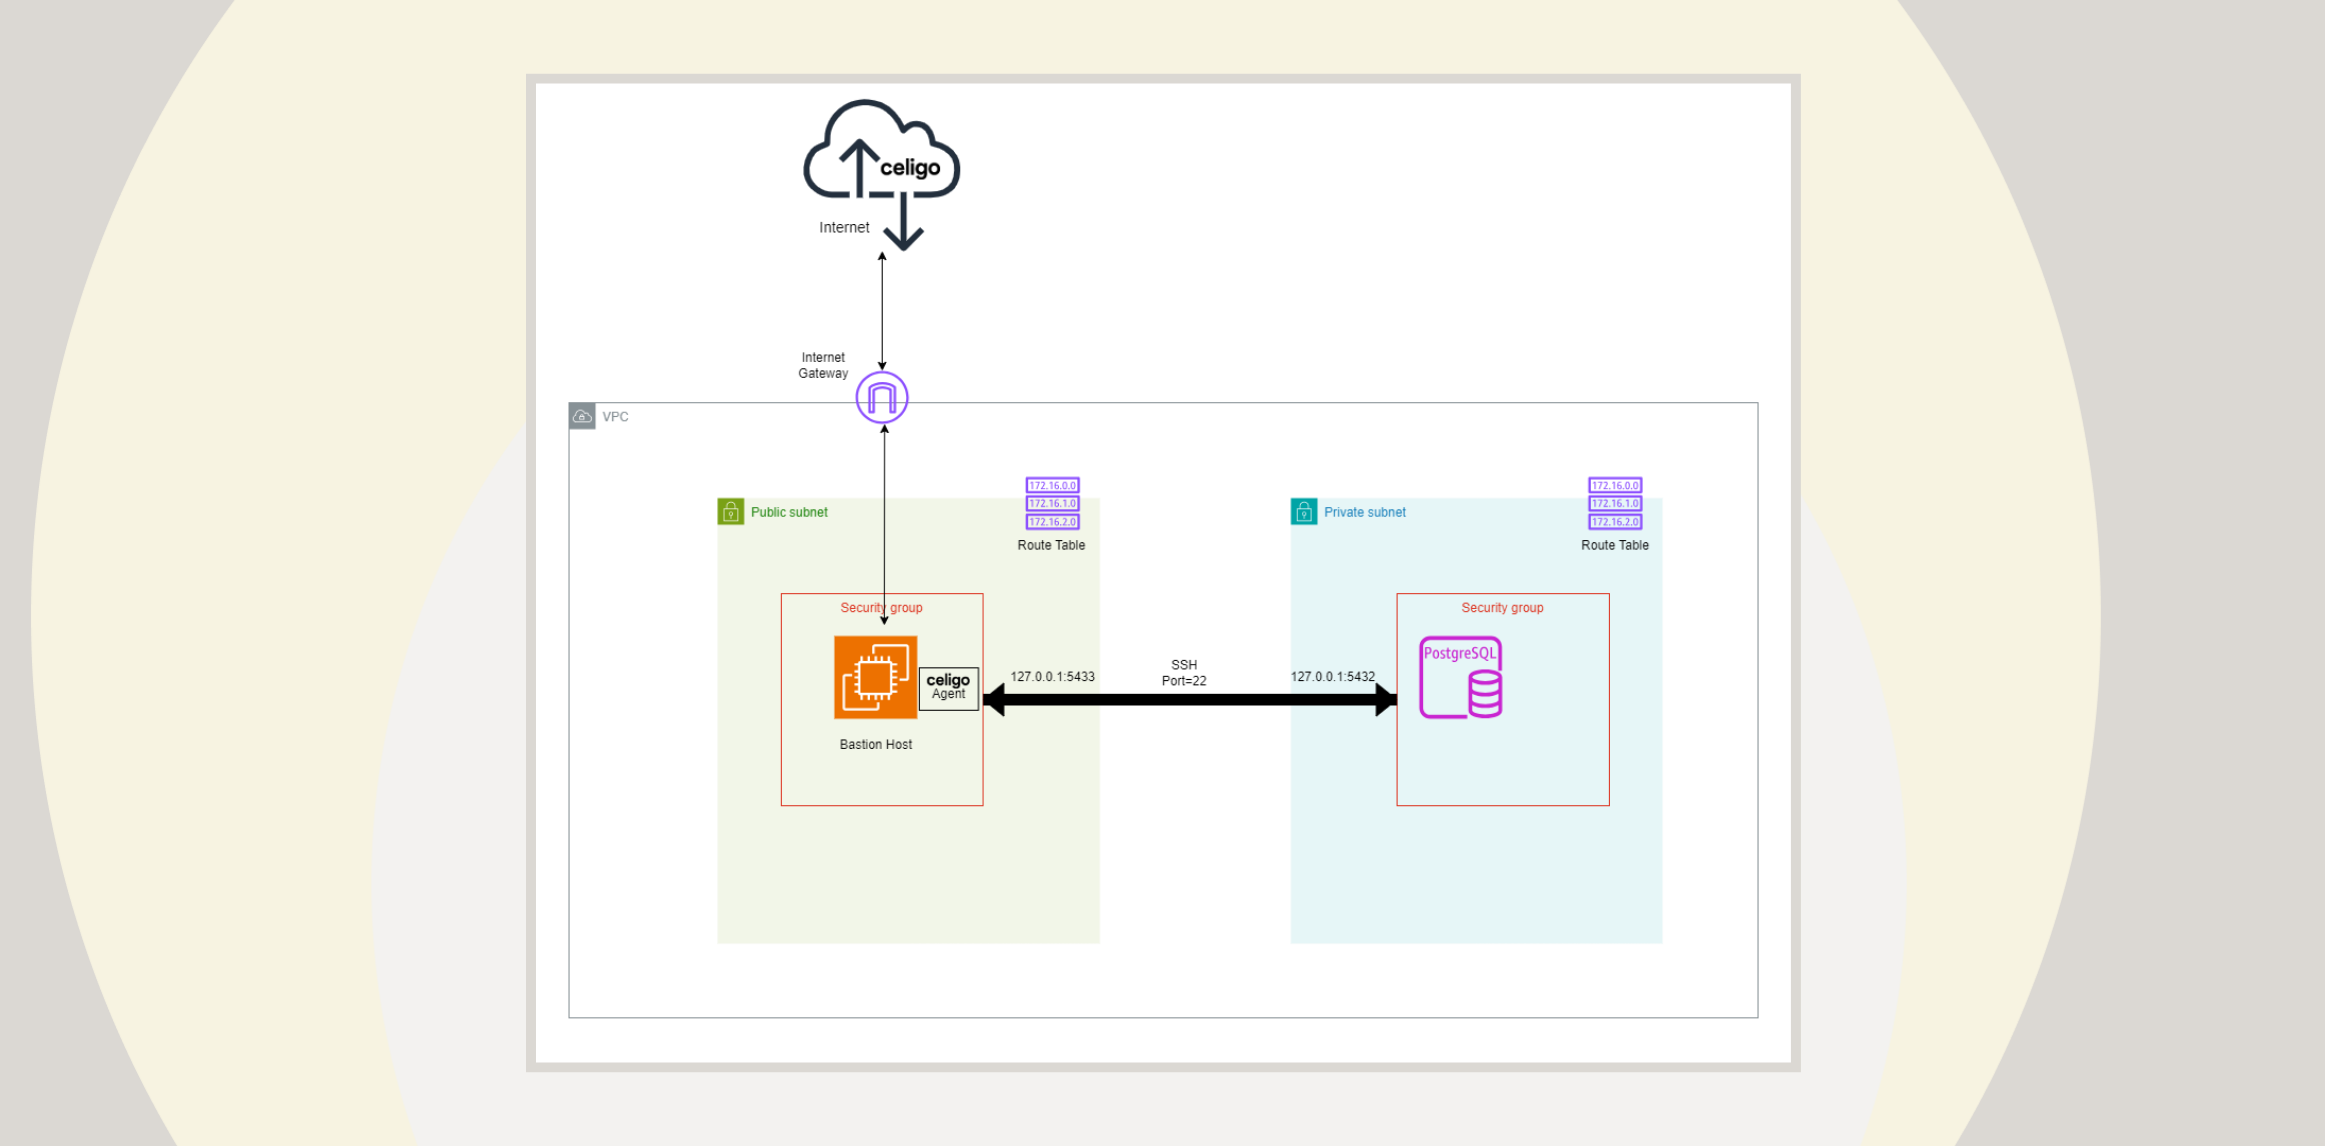
Integrating cloud-based services with private resources can be challenging, especially when security is a top priority. This article explains how to securely connect the Celigo integration platform as a service (iPaaS) to a private resource in a private subnet.
We will use a PostgreSQL database hosted on AWS, a bastion host and SSH tunneling in this example.
The Architectural Challenge
Companies often host sensitive data within private subnets without direct internet access. Celigo requires an on-premises agent to connect to such private resources. The challenge lies in enabling the Celigo on-premises agent to communicate with isolated private resources without compromising security.
Why Use SSH Tunneling Over Opening Ports?
Opening database ports to the internet (or other public subnets) can expose your system to unauthorized access and potential attacks.SSH tunneling provides a secure alternative by creating an encrypted connection between the bastion host and the private database without publicly exposing sensitive ports. This method ensures data remains protected and access is tightly controlled.
The Solution: Using a Bastion Host and SSH Tunneling
1. Deploy a bastion host accessible to both environments
A bastion host acts as a gateway between the public internet and the private network. It provides a controlled point of access and withstands potential attacks.
Example with AWS
Setup:
- Create an EC2 instance (bastion host) in a public subnet within your AWS VPC.
- Assign it a public IP address (e.g., 18.223.15.135) to communicate with Celigo over the Internet.
- Install the Celigo on-prem agent on the bastion host. The agent can be installed on either Windows or Linux instances.
2. Secure the Private Instance
Your private PostgreSQL database remains within a private subnet and is not directly accessible from the internet.
Example with AWS
Setup:
- Launch an EC2 instance running PostgreSQL in a private subnet within the same VPC.
- Ensure it has no public IP address.
- The private instance’s IP address might be 172.31.96.144.
3. Establish SSH Access Between the Bastion and Private Instances
Set up SSH access to securely connect the bastion host to the private instance.
Example with AWS
SSH Key Pair Generation:
-
- Generate an SSH key pair on the bastion host:
ssh-keygen -t rsa -b 4096 -f ~/.ssh/bastion_to_private -N ""-
- Copy the public key (~/.ssh/bastion_to_private.pub) to the authorized_keys file of the ec2-user on the private instance.
Security Group Rules:
- Private Instance Security Group:
-
- Inbound Rule: Allow SSH (port 22) from the bastion host’s private IP address (172.31.80.80).
- Bastion Host Security Group:
-
- Outbound Rule: Allow SSH (port 22) to the private instance’s IP address (172.31.96.144).
4. Set Up an SSH Tunnel
Create an SSH tunnel from the bastion host to the private instance to securely forward traffic.
Example with AWS
- On the Bastion Host:
- Run the following command to establish the SSH tunnel:
ssh -N -L 5433:localhost:5432 -i ~/.ssh/bastion_to_private
[email protected]

Explanation:
- -N: Do not execute a remote command.
- -L 5433:localhost:5432: Forward port 5433 on the bastion host to port 5432 on the private instance.
-
- 5433: Local port on the bastion host.
- localhost: Refers to the private instance itself.
- 5432: Port where PostgreSQL is listening on the private instance.
- -i ~/.ssh/bastion_to_private: Use the SSH key you generated.
- [email protected]: Connect as ec2-user to the private instance at 172.31.96.144.
5. Install the Celigo Agent
Install the Celigo on-premises agent on the bastion host to enable communication with the private PostgreSQL database through the SSH tunnel.
Example with AWS
- Installation:
- Follow Celigo’s installation instructions to install the agent on the bastion host.
- Ensure the agent is configured to connect to localhost on port 5433, which is forwarded to the private database.

6. Testing the Connection
Verify that the SSH tunnel and the database connection are working correctly.
Example with AWS
- From the Bastion Host:
- Use psql to connect to the PostgreSQL database through the SSH tunnel:
psql -h localhost -p 5433 -U postgres -d testdb- Explanation:
- psql: The PostgreSQL command-line client.
- -h localhost: Connect to localhost (the bastion host itself).
- -p 5433: Use port 5433, which is forwarded to the private instance’s PostgreSQL port 5432.
- -U postgres: Connect as the PostgreSQL user postgres.
- -d testdb: Connect to the database named testdb.
- If prompted, enter the password for the PostgreSQL user.
- You should now have access to the PostgreSQL database running on the private instance.

7. Automate the SSH Tunnel
Manually establishing the SSH tunnel each time is impractical. Automating this process ensures consistent connectivity.
Example with AWS
- Create a Script:
- Write a shell script (e.g., /home/your_username/start_ssh_tunnel.sh) on the bastion host containing the SSH command:
#!/bin/bash
ssh -N -L 5433:localhost:5432 -i /home/your_username/.ssh/bastion_to_private
[email protected]
Make the script executable:
chmod +x /home/your_username/start_ssh_tunnel.sh- Set Up a Service:
- Create a systemd service file:
sudo nano /etc/systemd/system/ssh_tunnel.serviceAdd the following content:
[Unit]
Description=SSH Tunnel to Private PostgreSQL Database
After=network.target

[Service]
Type=simple
User=your_username
ExecStart=/home/your_username/start_ssh_tunnel.sh
Restart=always
RestartSec=10

[Install]
WantedBy=multi-user.target
Reload systemd to recognize the new service:
sudo systemctl daemon-reloadEnable and start the service:
sudo systemctl enable ssh_tunnel.service
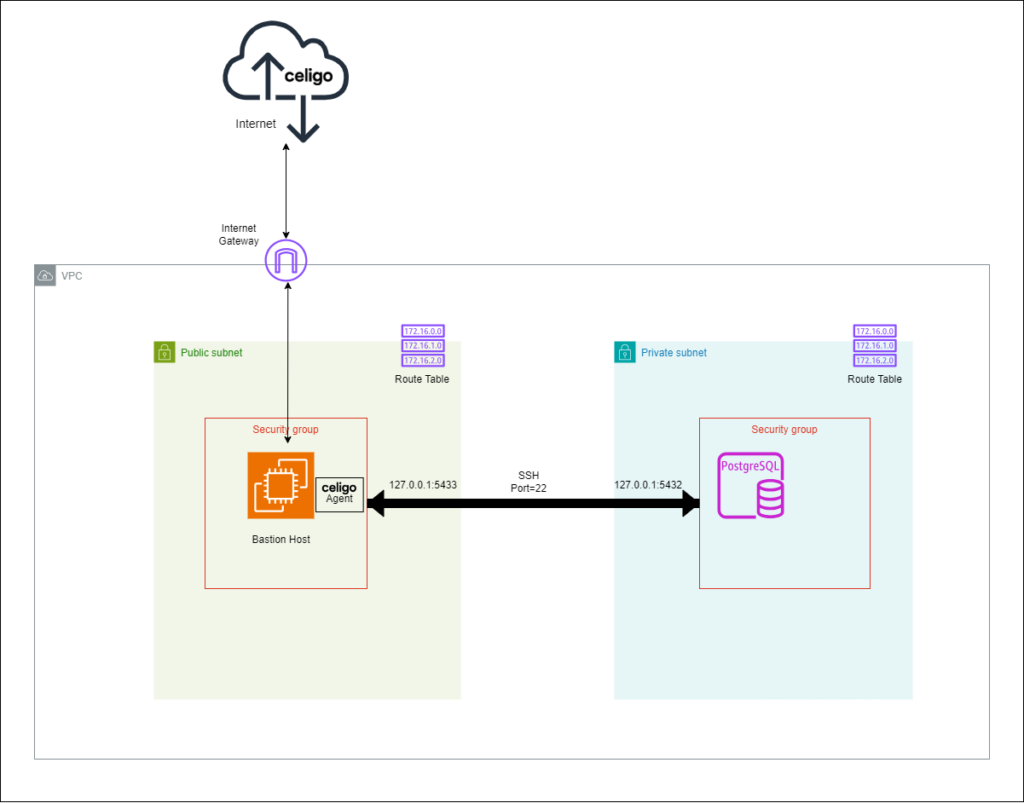
sudo systemctl start ssh_tunnel.serviceAlternative Configuration: Using a Separate Public Instance for the Celigo’s Agent
Some organizations prefer not to install additional software on the bastion host. In such cases, you can deploy the Celigo on-premises agent on a secondary public instance in a separate subnet. This setup involves establishing an SSH tunnel from the secondary public instance to the bastion host (similar to steps 3 and 4 above), which already has an SSH tunnel to the private PostgreSQL database.
One such configuration is depicted below:

This configuration allows the agent to securely access the database without installing any additional software on the bastion host.
The architecture involves:
- Secondary Public Instance: Hosts the Celigo’s agent.
- Bastion Host: Maintains an SSH tunnel to the private database.
- Private PostgreSQL Database Instance: Remains in the private subnet.
By chaining SSH tunnels, you ensure secure communication between the agent and the private database while adhering to strict security policies.
Conclusion
Using a bastion host and SSH tunneling, you can securely integrate Celigo with a private PostgreSQL database hosted on AWS. This approach maintains high-security standards by keeping your private instance inaccessible from the public internet while allowing necessary communication for integration.
This solution balances security and functionality, enabling your business to leverage cloud-based services without compromising sensitive data.